Complete Guide to Manually Adding Product on Carata 4
Purpose:
This guide explains how to manually add a new product to a business branch using the Add New Product (Text) option in the Carata Business App.
This method is designed for businesses that want to enter product information manually instead of importing products from images.
Prerequisites:
Before adding a product, ensure that you have:
- Registered Carata Business account.
- At least one registered business.
- Created at least one business branch.
Products are always added to a specific branch. If your business does not have any branches yet, first complete the Adding Business Branches guide https://carata.co/blog/2026/08/14/how-to-add-business-branches-on-carata-4/.
Accessing Product Management
- Log in to the Carata Business App.
- Open the business you want to manage.
- Navigate to Inventory.
The Inventory page provides three primary Quick Action buttons:
- Add Products from Images
- Add New Product (Text)
- Fill Inventory
This article focuses on Add New Product (Text).
Note: The Add Products from Images feature uses Carata AI to scan product photos and automatically extract product information. This feature is covered in a separate article.
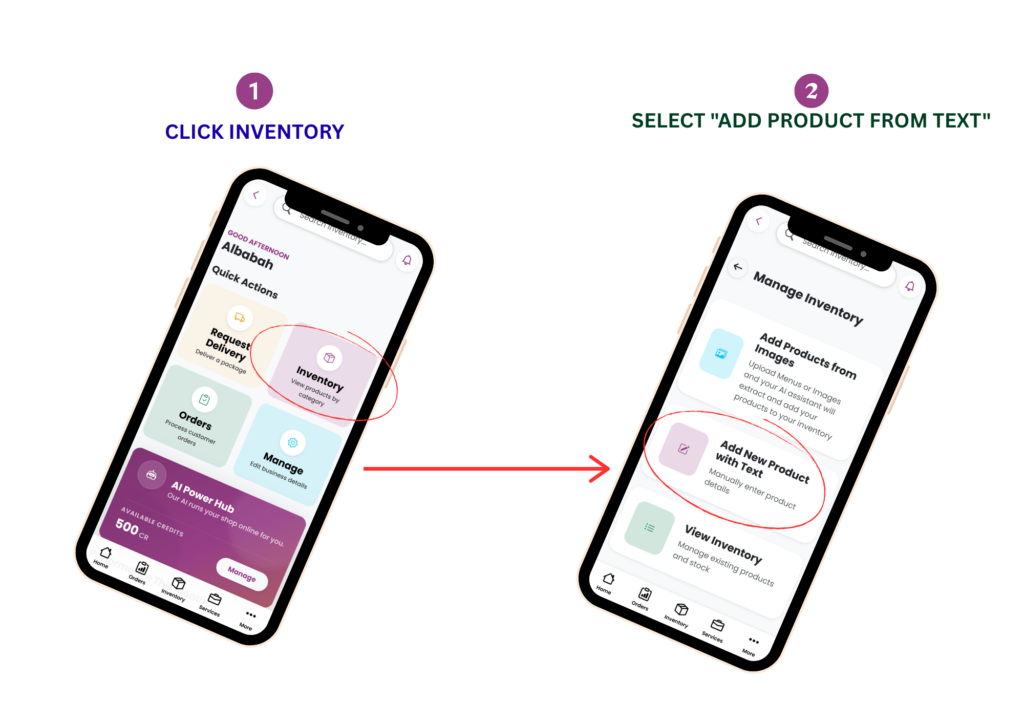
Select Add New Product With Text to begin.
Step 1: Enter Basic Product Information
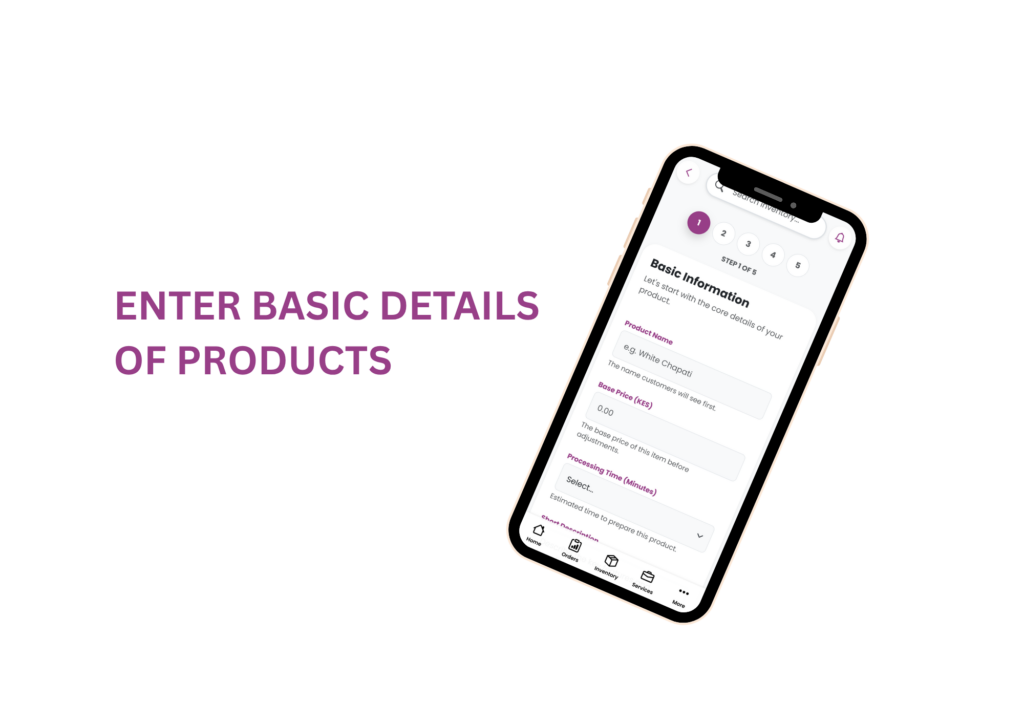
The first page collects the essential information about your product. Complete each field carefully.
Product Name
Firstly, enter the name customers will see when browsing your products.
For Examples:
- Chicken Burger
- Fresh Orange Juice
- Men’s Polo Shirt
- Office Notebook
Choose a clear and descriptive product name.
Product Price
Next, enter the product’s base selling price.
Automatic Commission Calculation
As you enter the product price, Carata automatically calculates pricing based on your business’s commission settings.
For example:
If your business commission configuration is:
- Customer pays 4%
- Business pays 11%
Carata automatically:
- Calculates the customer’s price (including the 4% markup).
- Displays the amount the business will receive after the 11% commission is deducted.
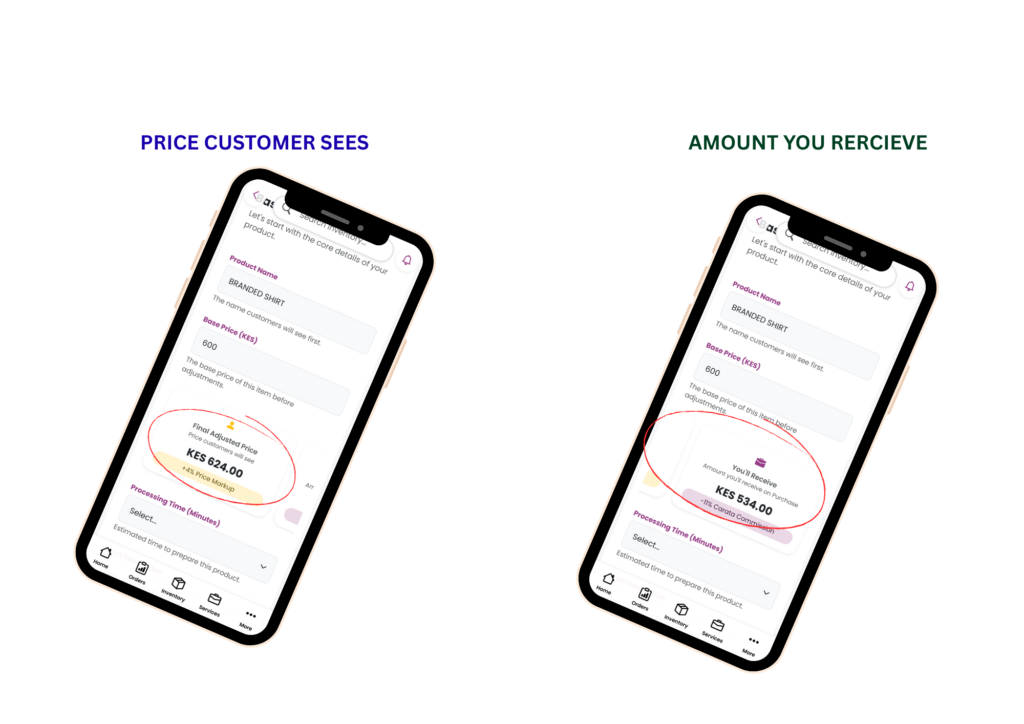
This allows you to immediately see how your pricing affects both the customer and your business earnings.
Note: The displayed calculations update automatically whenever the price changes.
Processing Time
Next, enter the estimated time required to prepare the product.
Processing time is entered in minutes.
For instance:
- 10 minutes
- 20 minutes
- 45 minutes
- 60 minutes
Customers use this estimate to know how long it will take before their order is ready.
Product Description
Then, provide a short description explaining the product.
A good description helps customers understand:
- What the product is.
- Key ingredients or materials.
- Important features.
- Why they should purchase it.
Such as:
Freshly grilled chicken burger served with lettuce, cheese, and homemade sauce.
Keep descriptions short, accurate, and informative.
Step 2: Track Stock and SKU (Optional)
Carata allows businesses to monitor inventory by enabling Track Stock. However, if you do not need stock tracking, you may leave this option disabled. If you want Carata to manage your inventory automatically, enable Track Stock. When enabled, additional fields become available.
Stock Quantity
Enter the number of units currently available.
Example:
If you have:
- 50 shirts
Enter:
50
This becomes the available inventory for that product. Every successful customer purchase automatically reduces the available quantity. However, Carata doesn’t count product that are purchased off the app. Therefore, if the stock reduces by purchased made off the app, Carata won’t account for such reduction.
Low Stock Notifications
Carata continuously monitors your inventory. When the remaining quantity falls below 20 units, Carata begins sending notifications reminding you that stock is running low. This helps businesses restock products before they become unavailable.
Out of Stock Handling
If the available quantity reaches 0, Carata automatically marks the product as:
Out of Stock
Customers will no longer be able to purchase the product until inventory is replenished.
Product SKU (Optional)
SKU stands for Stock Keeping Unit. This field is optional. Businesses that already use inventory management systems may assign their own SKU code to each product.
Example:
- SHIRT-001
- BURGER-XL-05
- DRINK-250ML
If you do not already use SKU codes, you may leave this field empty. You can also add SKU codes by putting the name of the product and a number description.
Step 3: Product Images
After entering the product information, Carata asks:
Do you already have an image for this product?
Choose the option that best matches your situation.
Option 1: No, I Do Not Have an Image
If you select No, then choose Continue. You will skip the step of adding images manually and move on to the next step of adding variations of the product.
Carata AI will generate a product image based on the information you entered. This allows businesses to publish products even if they do not have professional product photos.
Note: AI-generated images may consume AI Credits. AI Credits are explained in a separate guide.
Option 2: Yes, I have images
If you select Yes, then choose Continue.
The Product Images page opens.
Uploading Product Images
The Product Images page contains a placeholder labeled:
Click to Add Product Image
- Selecting this placeholder opens your device’s file manager.
- Choose the image you want to upload.
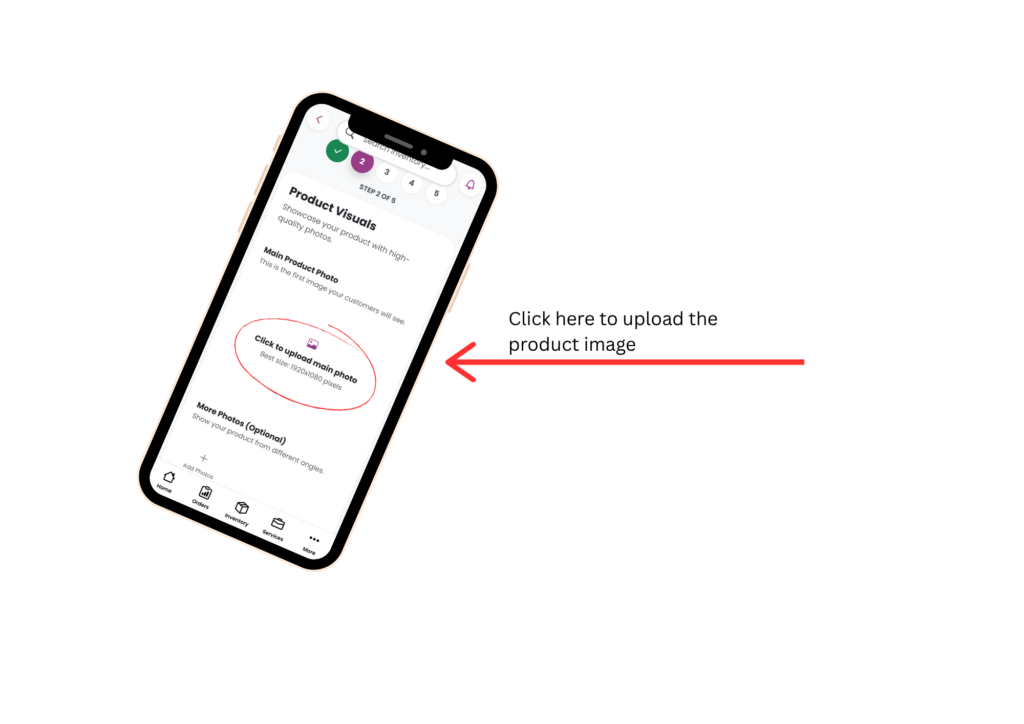
After selecting the image, it is attached to the product.
Add Multiple Images
If you have more than one image, select the plus sign(Add PPhoto) right under Add more photo.
You may upload additional images showing different views or angles of the same product. Providing multiple images helps customers better understand what they are purchasing.
AI Image Enhancement (Optional)
Carata offers an optional AI enhancement feature for uploaded images.When enabled, AI can improve image quality by enhancing clarity and presentation. Carata AI can also improve product photos by removing unwanted backgrounds or distracting objects. This feature helps create cleaner, more professional-looking product images.
Like other AI-powered tools, this feature uses AI Credits.
Step 4: Product Variations
After completing the image section, Carata asks:
Does this product have variations?
Select the appropriate option. If the Product Has No Variations
Select:
No
Then continue to the next step of product creation. If the Product Has Variations
Select:
Yes
Carata opens the Product Variations page.
Here you can create different versions of the same product.
Common variation types include:
- Color
- Size
- Material
- Flavor
- Weight
- Packaging
- Style
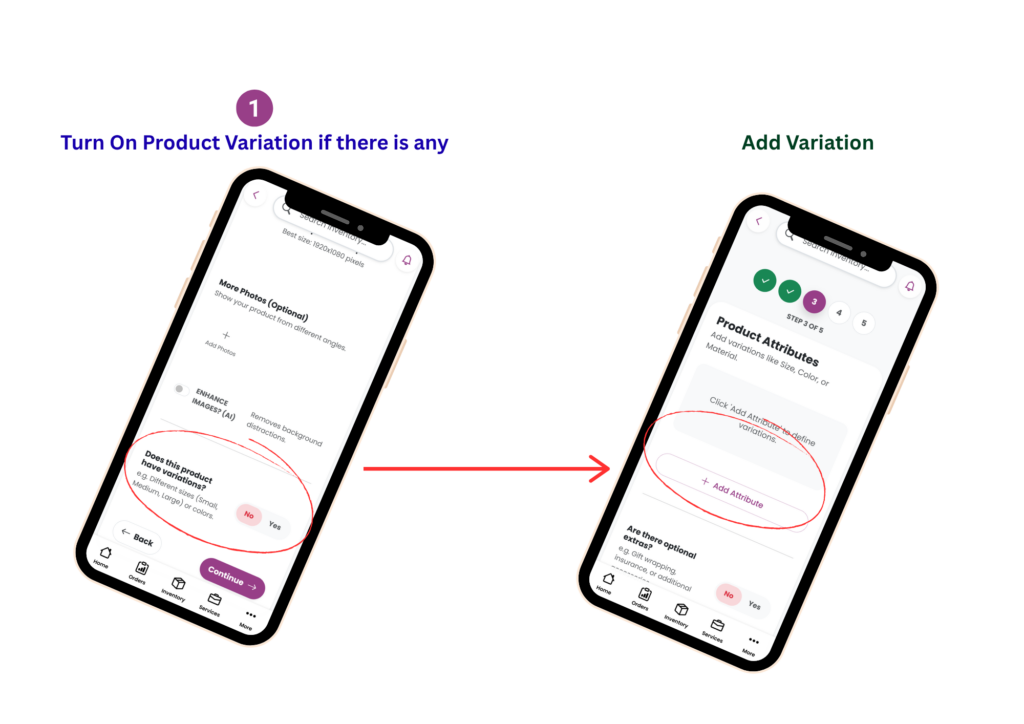
Examples:
Variation Type Options
Color: Black, Blue, Red
Size: Small, Medium, Large
Materia: Cotton, Polyester
Flavor: Vanilla, Chocolate, Strawberry
Variations allow customers to customize or select different versions of the same product, such as choosing a color, size, or material.
To begin, select:
Add Attribute
A new window (modal) titled New Attribute will open.
Configure the Attribute
Complete the following fields:
Attribute Name
Enter the name of the variation.
Examples:
- Color
- Size
- Material
- Flavor
- Weight
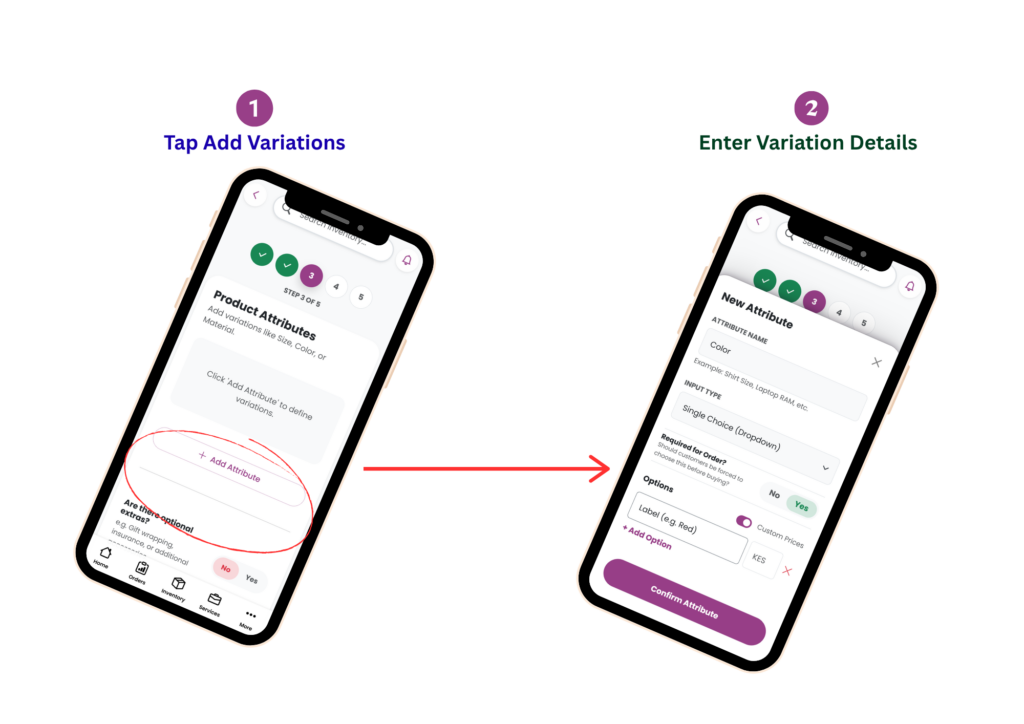
The attribute name tells customers what they are selecting.
Input Type
Choose how customers will provide their selection.
Available input types may include:
- Single Choice (Dropdown) – Customers can select one option from a list. This affect price.
- Multiple Choice – Customers can select more than one option.
- Text Input(Custom Message) – Business can enter a text to describe the attribute.
- Number Input – Customers enter a numerical value if applicable. This can affect price also.
Choose the input type that best matches the attribute.
Required for Order
Next, decide whether customers must select this attribute before placing an order.
You will be asked:
Required for order?
Select:
- Yes – Customers must choose a value before they can add the product to their cart.
- No – Customers may leave the attribute unselected.
Use Yes for essential selections, such as clothing sizes or meal choices. Use No for optional selections.
Attribute Options
Before selecting the attribute options, first select whether the options affect price.
A button on the right of options that read:
Custom Prices.
Turn it on if the options affect prices.
Example
Chapati in Naivas supermarket has variations that affect prices:
Brown and white Chapati have different prices. If the variations don’t affect price, turn the custom price button off if it is on. Depending on the input type you selected, Carata allows you to define the available options.
Examples:
Attribute: Color
Options:
- Red
- Blue
- Black
- White
Attribute: Size
Options:
- Small
- Medium
- Large
- Extra Large
These options are presented to customers when ordering the product.
Save the Attribute
After entering all the required information, select:
Confirm Attribute
The attribute is saved, and you are returned to the Product Variations section (Step 3). If your product requires additional attributes, repeat the same process by selecting Add Attribute again.
Before moving to the final step, Carata asks:
Does this product have optional extras?
Optional extras allow customers to add complementary products to their order. Extras must be a product saved in the list of business products.
Examples include:
- Extra cheese
- Soda (Soft Drinks)
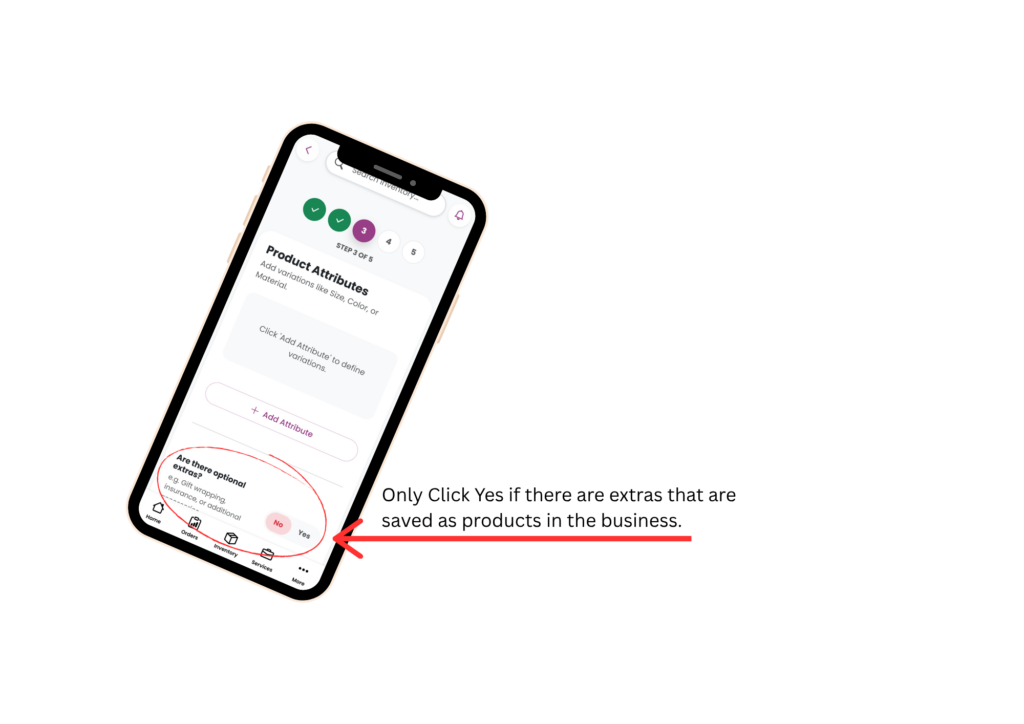
Option 1: No Optional Extras
If the product does not offer any extras, select:
No
Carata skips the extras configuration and proceeds to the next stage when you press continue.
Option 2: Yes, This Product Has Extras
If the product offers additional items, select:
Yes
When all required attributes have been added and the option of extras or not have been chosen, select:
Continue
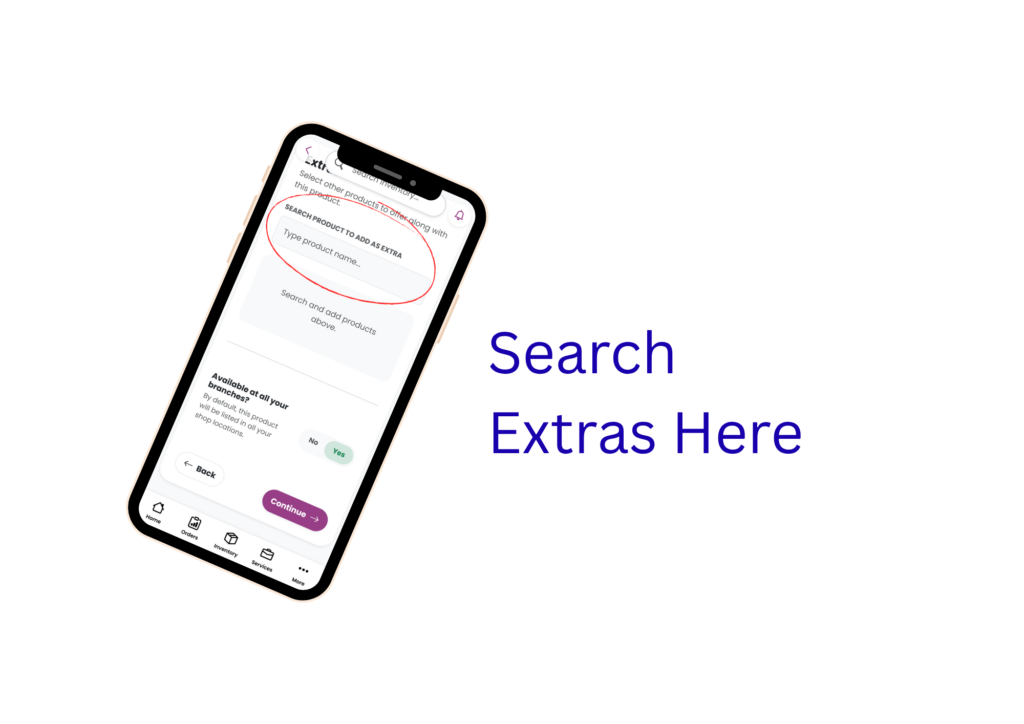
Step 6: Configure Optional Extras (If Yes was chosen)
If you choose YES, and press Continue, The Extras page opens, allowing you to add each optional item.
For each extra, provide the relevant details, such as:
- Extra name
- Price (if applicable)
- Any additional information required
You can add multiple extras to the same product. These extras are displayed to customers during the ordering process, allowing them to customize their purchase. Once all extras have been added, continue to the final step.
Step 7: Choose Branch Availability
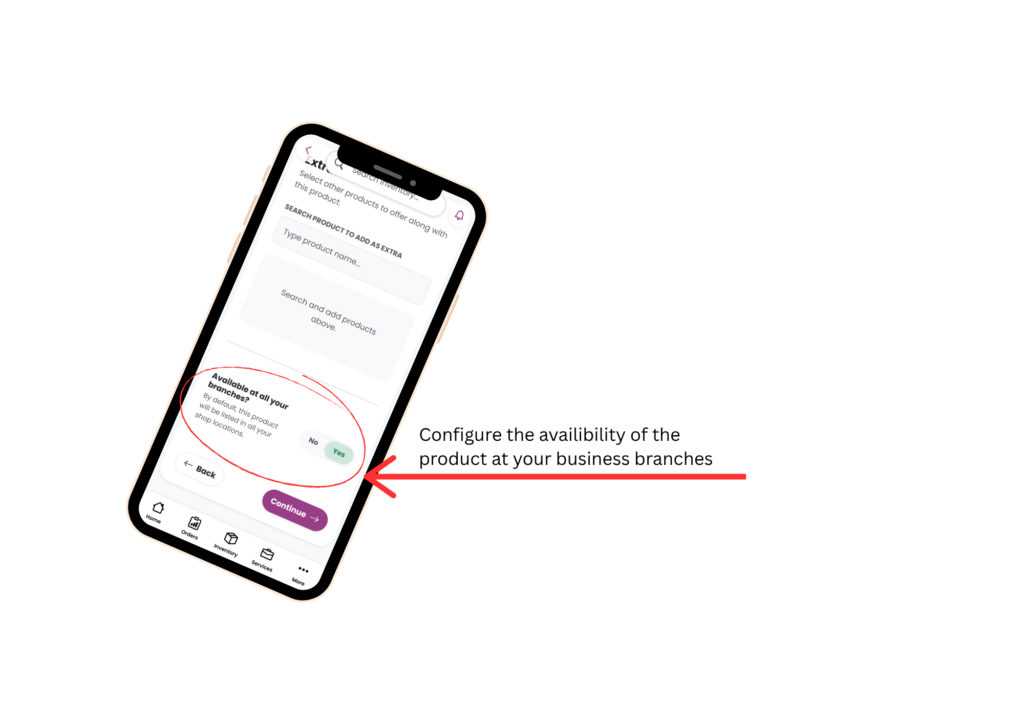
The final configuration determines where the product will be available.
Carata asks:
Should this product be available at all branches?
Option 1: Yes
If you select:
Yes
The product becomes available at every branch registered under your business.
No further branch selection is required.
Option 2: No
If you select:
No
Carata opens a branch selection window.
You can then choose the specific branches where the product should be available.
Only the selected branches will:
- Display the product.
- Sell the product.
- Receive customer orders for the product.
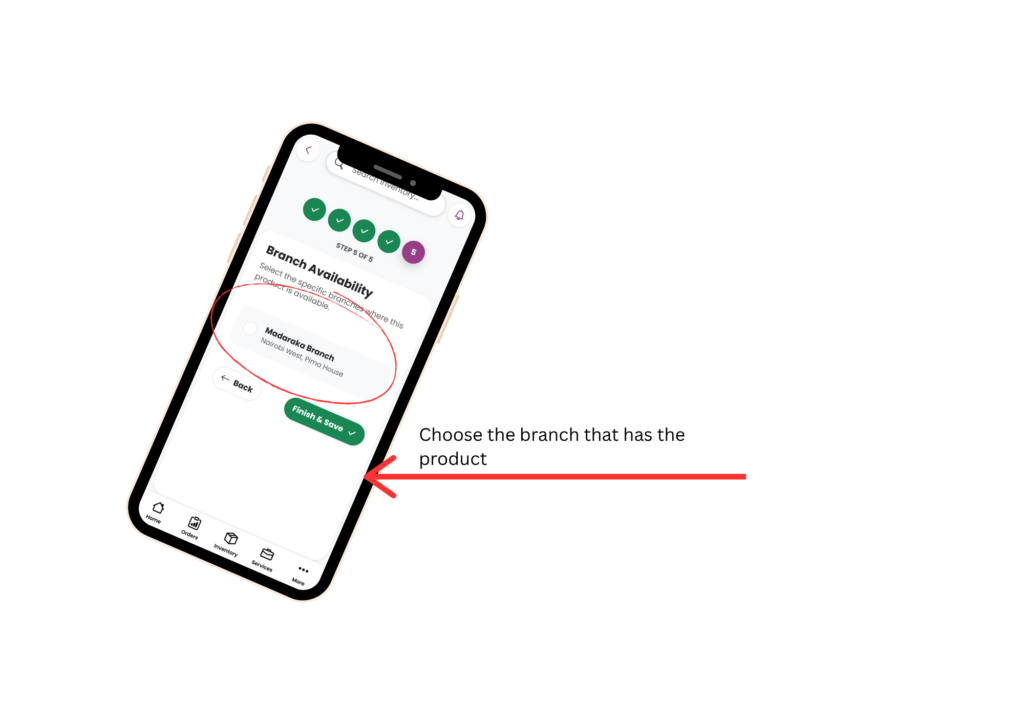
This is useful when different branches carry different inventory. After selecting the appropriate branches, confirm your selection.
Step 8: Finish and Save
Once all product information has been completed, review the details for accuracy.
Select:
Finish and Save
Carata creates the product and adds it to your branch inventory.
Finding Your Product
After the product has been successfully created, you can locate it in your inventory.
- Navigate to the Inventory page.
- Use the Search bar at the top of the inventory list.
- Search using the product name.
If the product was successfully saved, it will appear in the inventory results and is now ready to be managed, updated, or made available for customer orders.
Expected Result
After completing all steps:
- The product is successfully created.
- Product variations (if any) are saved.
- Optional extras (if configured) are available to customers.
- The product is assigned to the selected branch or branches.
- The product appears in your inventory list.
- Customers can order the product once it is published and available.