A Step-by-Step Guide To Set Up Busines Branches on Carata 4
Purpose:
This guide explains how to add a new branch to an existing business on the Carata Business App. Every business must have at least one branch before products can be added, inventory can be managed, or customer orders can be processed.
A branch represents a physical operating location where orders are prepared, managed, or fulfilled.
Prerequisites:
Before you can add a business branch, you must:
- Have a registered Carata Business account.
- Have at least one business already registered on Carata.
If you have not yet registered a business, first complete the article:
How To Register Businesses on Carata https://carata.co/blog/2026/08/13/how-to-register-businesses-on-carata-4/
Understanding Business Branches
A business may have more than 1 branch. A branch is the physical location where your business operates.
Each branch has its own:
- Branch name
- Contact phone number
- Email address
- Physical location
- Google Maps location
Moreover, orders placed by customers are assigned to a branch, and notifications are sent to the contact details configured for that branch.

Ways to Access the Branch Management Page
After logging into the Carata Business App, your business Home page opens. At the top of the page, you will see a greeting similar to:
Good Afternoon
followed by your registered business name.
The Home page also contains several Quick Action buttons, including:
- Request Pickup
- Inventory
- Orders
- Manage
Also, the navigation sidebar contains additional menu items such as:
- Home
- Orders
- Inventory
- Services
- Analytics
- Order Requests
- Business Info
There are three different ways to access the Branch Management page.
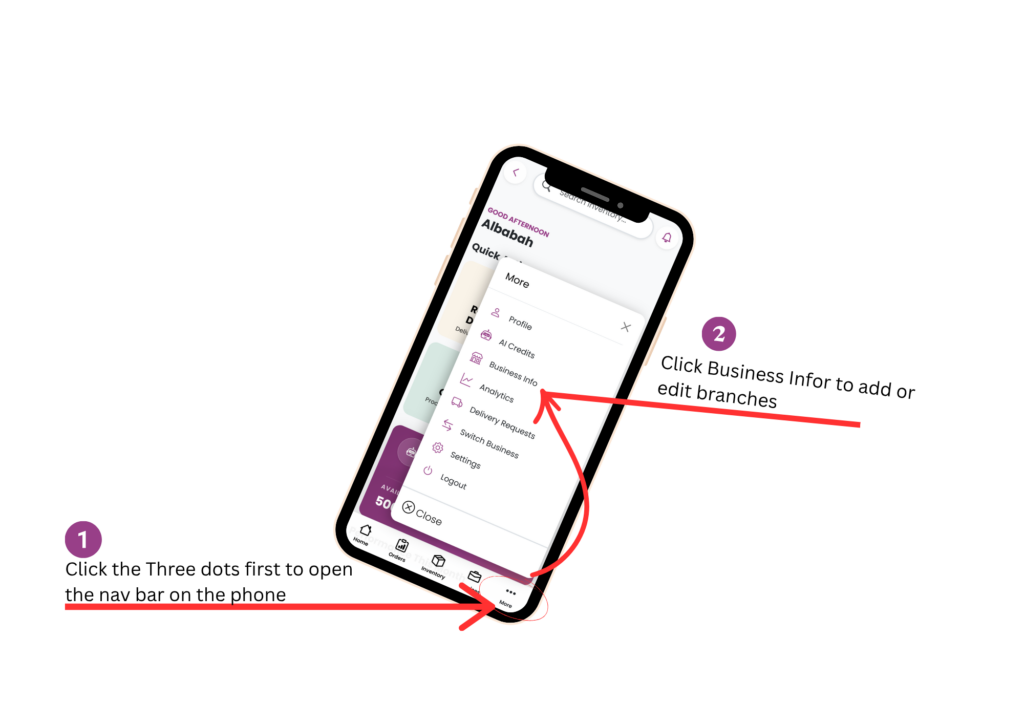
Method 1: Through Business Info
- Open the sidebar
- on mobile phone, click the three dots on the navigation bar and select Business Info.
- Select Business Info.
This opens your business profile, where you can view:
- Business details
- Number of registered branches
- Other business information
In the business info section, you will see a button that says “Add branch”.
Method 2: Through Inventory
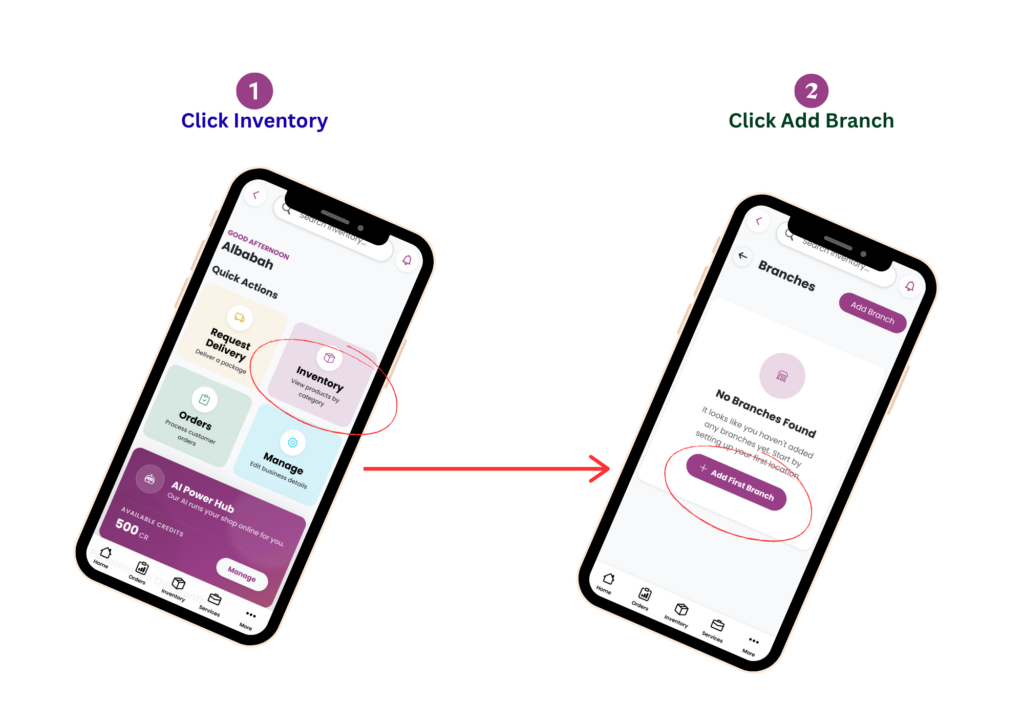
From the Home page, tap Inventory.
If your business does not yet have any branches, Carata cannot display inventory because inventory belongs to a specific branch.
Therefore, the app automatically redirects you to the Business Info page so you can create your first branch.
Method 3: Through Manage
Alternatively, on the Home page, tap Manage.
This also opens the Business Info page, where branch management is available.
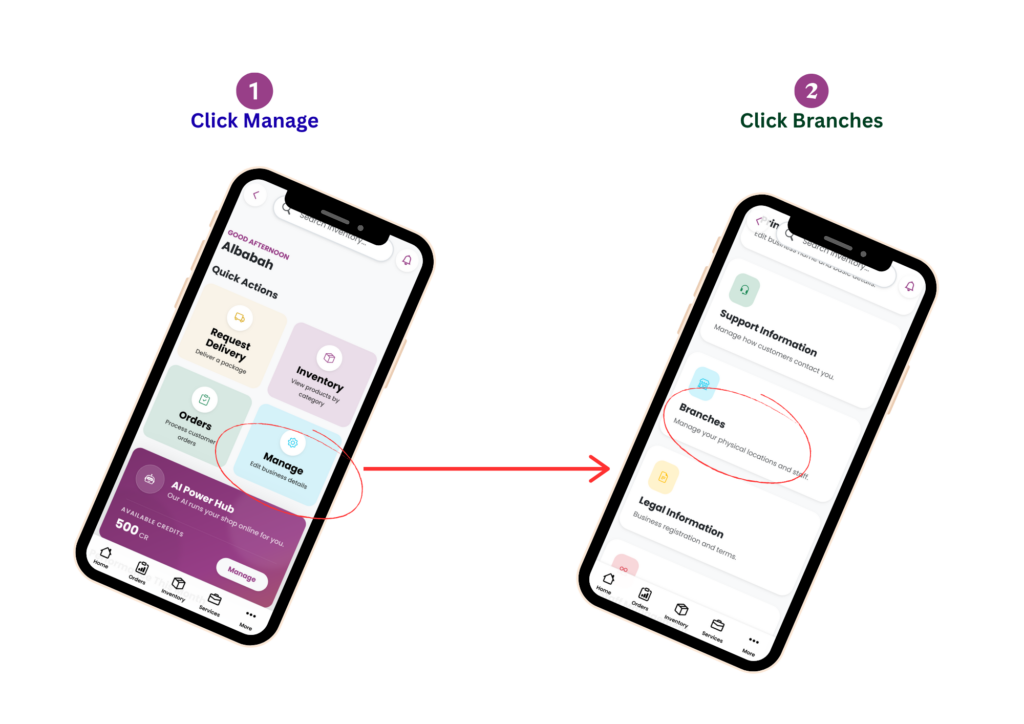
Adding Your First Branch
If your business has no branches, the Business Info page displays the following message:
No Branch Found
Below this message is a button labeled:
Add First Branch
Select Add First Branch to begin.
A branch registration form (modal window) will appear.
Adding Additional Branches
If your business already has one or more branches, the existing branches will be displayed on the Business Info page.
Instead of Add First Branch, you will see a button similar to:
Add New Branch
Select this button to create another branch.
The same branch registration form will open.
Step 1: Enter Branch Information
Complete the required information for the branch.
Branch Name
Enter the name of the branch.
Examples:
- Westlands Branch
- Nairobi CBD Branch
Choose a name that helps distinguish this branch from your other locations.
Contact Phone Number
Enter the phone number for the staff member or manager responsible for this branch.
Moreover, This number is important because it receives branch-related notifications, including new customer orders.
Ensure that:
1. The phone number is active.
2. The responsible staff member has access to it.
3. The number is regularly monitored during business hours.
Branch Email Address
Enter the email address associated with this branch.
This may be used for branch communication, notifications, and administrative purposes.
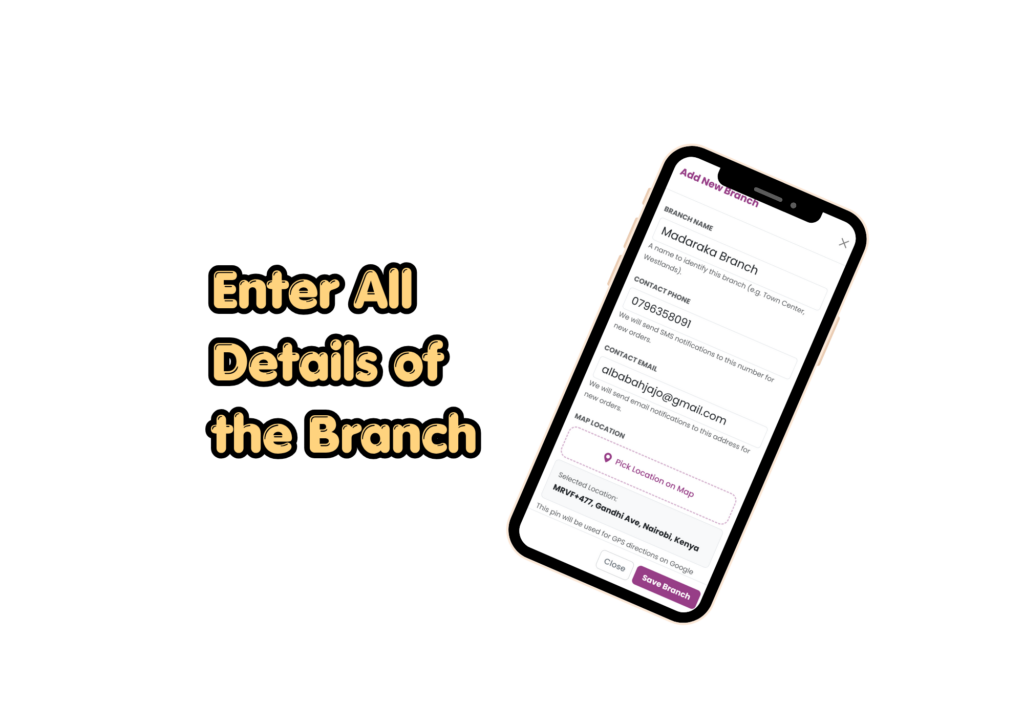
Step 2: Set the Branch Location
Each branch must have an accurate location so customers, delivery personnel, and Carata services can identify where the branch operates.
Within the registration form, select:
Add Location
Carata opens a Google Maps interface.
You have two options:
Option 1: Use Your Current Location
Meanwhile, if you are physically at the branch, choose your current location.
Google Maps will automatically detect your location.
Option 2: Search for the Branch Location
However, If you are not currently at the branch, search for the branch’s location manually.
You can search by:
- place name.
- street name.
- landmark.
- Move the map pin to the correct position.
Once the correct location has been selected, save the location.
Carata records the branch’s map coordinates and returns you to the branch registration form.
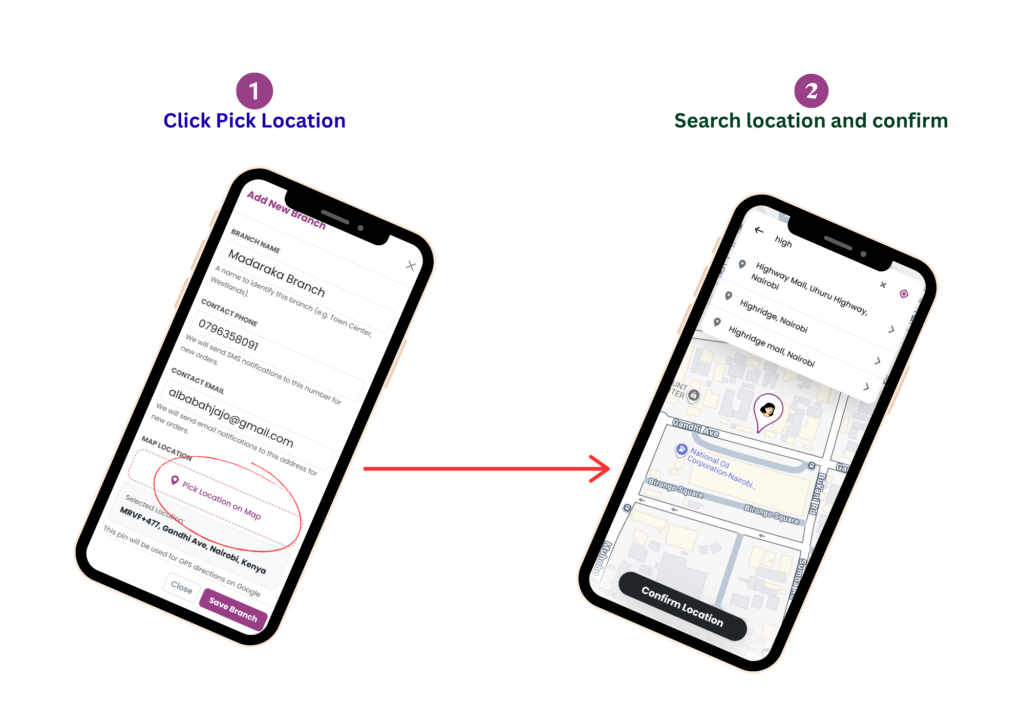
Step 3: Enter the Physical Address
Next, provide a physical address.
This address helps delivery personnel locate the branch more easily.
Include helpful information such as:
- Building name
- Street name
- Floor number
- Nearby landmarks
- Shopping mall or plaza name
- Office or shop number
For example:
Ground Floor, Jaksaco Plaza, Ngong Road, opposite ABC Supermarket.
The more accurate the address, the easier it is for deliveries and customer support.
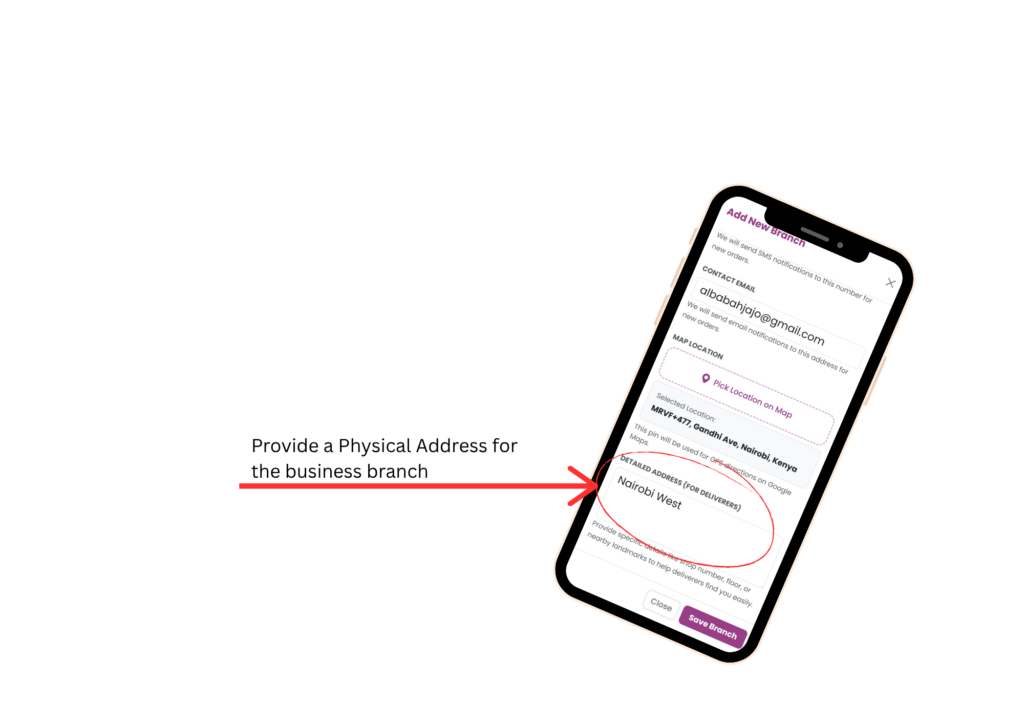
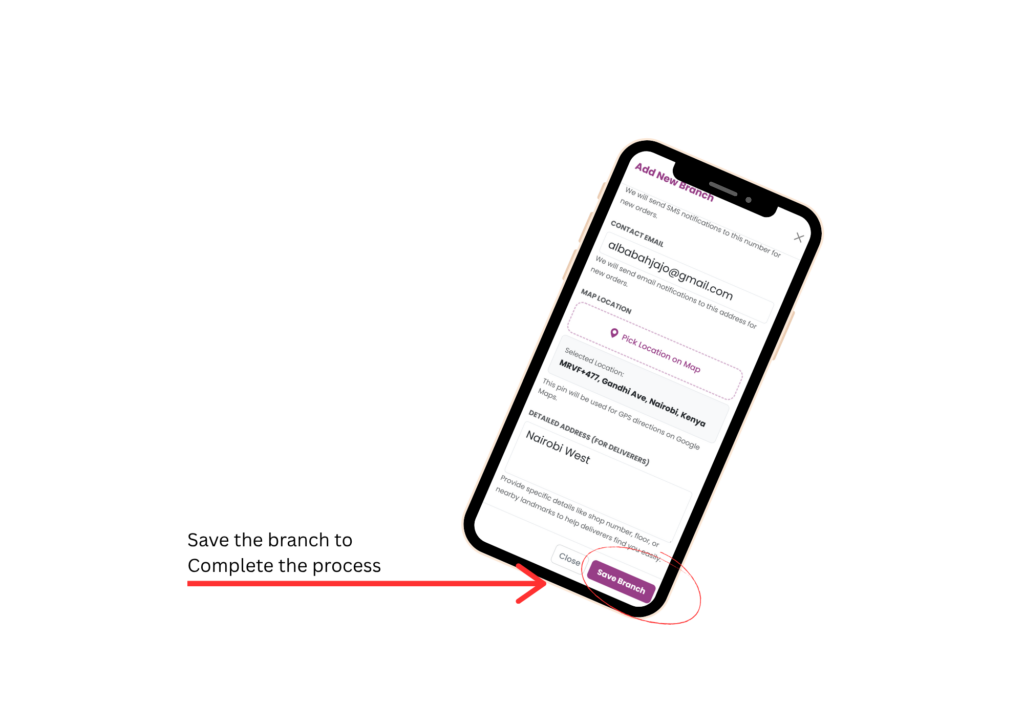
Step 4: Save the Branch
After confirming that all required information has been entered correctly:
- Branch Name
- Contact Phone Number
- Branch Email
- Google Maps Location
- Physical Address
Finally, Select:
Save Branch
Carata creates the new branch immediately.
What Happens After Adding a Branch?
Once the branch has been successfully created:
- The branch is added to your business profile.
- It appears in your list of branches.
- Inventory can now be added to this branch.
- Products can be assigned to this branch.
- Customer orders can be received and managed for this branch.
- Notifications will be sent to the branch contact number you configured.
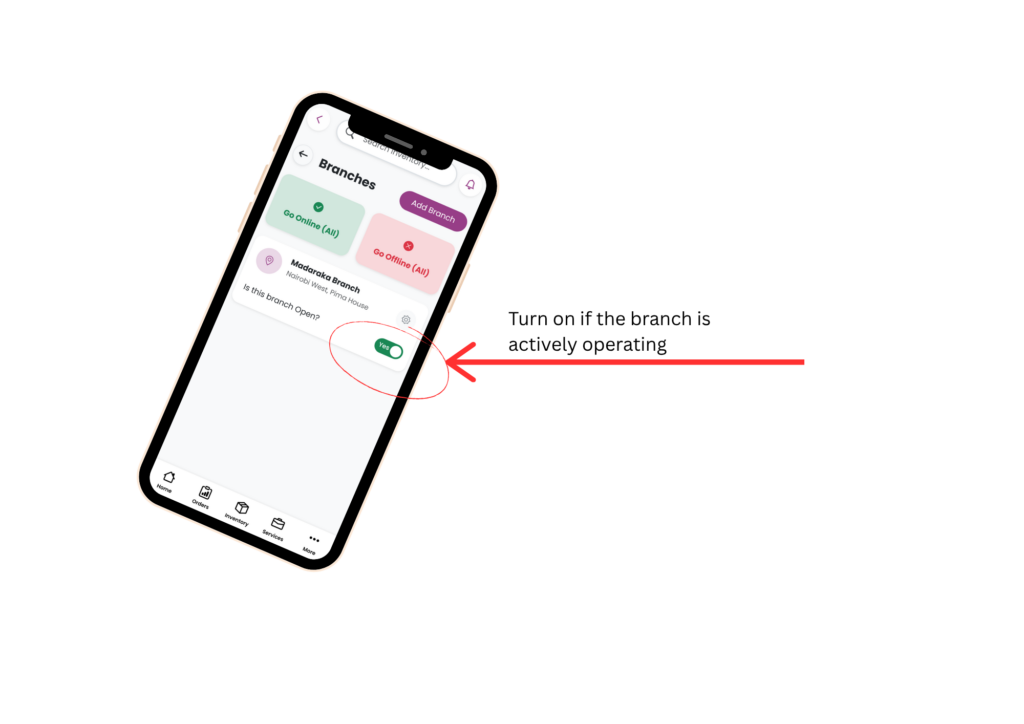
Below the branch name, You can choose between whether the branch is open or not by tapping the switch after the question “Is this branch open?”
Expected Result
After successfully completing this process:
1. Your business has at least one active branch.
2. The branch appears under Business Info.
3. You can begin adding products and managing inventory for that branch.
4. The branch is ready to receive customer orders.
Related Articles
The next recommended guides after creating a branch are:
- Adding Products
- Managing Inventory
- Editing Branch Information
- Reading Business Analytics
- Managing Customer Orders